Secure Your AWS EC2 Instance Metadata Service (IMDS)

Read this review of IMDS, an important AWS EC2 service component, to understand its two versions and improve your AWS security.
Using Amazon Elastic Compute Cloud (AWS EC2)? If so, whether you realize it or not, you are likely using Instance Metadata Service (IMDS), a significant component of how an EC2 instance works. If you care about your EC2 instances’ security, you’ll want to know a few things about IMDS.
We’ll start by reviewing IMDS. To help you maintain a high security bar, we’ll cover the two versions of the API that IMDS supports and the difference between them. We’ll also discuss the preferred option, and why you’ll want to use it as much as possible. We’ll go over the steps that can help prevent attackers with unauthorized users or third-parties from exploiting vulnerable software deployed on the EC2 and gaining access to your environment – and what to do about it.
Before starting, note that IMDS is secure software with potential gaps in the existing version. This post is a technical review meant to help you with an important component of the widely used EC2 service so you can have a more secure AWS environment.
What is IMDS?
The best practice (and probably simplest way) for giving an EC2 instance access to resources in your AWS account is by using an instance profile attached to it. The instance profile can include an IAM role (only one) that the Amazon EC2 service is allowed to assume. The IAM role’s trust relationship will be as such:
{
    "Version": "2012-10-17",
    "Statement": [
        {
            "Effect": "Allow",
            "Action": [
                "sts:AssumeRole"
            ],
            "Principal": {
                "Service": [
                    "ec2.amazonaws.com"
                ]
            }
        }
    ]
}
When the EC2 service performs the sts:AssumeRole call and retrieves the temporary credentials generated by STS, AWS stores the credentials in IMDS, which runs on a “link local” IP address of 169.254.169.254. The credentials are then made available to services running on the EC2 instance via an IMDS API.
IMDS is therefore an AWS mechanism that triggers the creation of, stores and makes available the security credentials used by applications and services (most notably, of course, the AWS SDK). IMDS is consequently a vital component of the EC2 instance that saves developers the need to manage credentials storage which, if done incorrectly, can cause security issues.
That said, attackers with unauthorized user or third-party credentials can leverage IMDS features to be able to extract and use the stored credentials to authenticate on behalf of the EC2.
Initially, IMDS supported one API version, called IMDS Version 1, or IMDSv1, for extracting IMDS-stored credentials. AWS subsequently introduced IMDS Version 2, a second API version, called IMDSv2. Version 2 API contains “belt and suspenders” (that is, applicable in multiple layers) protections to better secure the credentials as compared to IMDSv1.
Let’s review both IMDS API versions and their differences, as well as why and how to use IMDSv2 whenever possible. We’ll also look at how to responsibly manage migration from machines that support IMDSv1 to machines that don’t. We will describe a potential scenario in which a machine with IMDSv2 can still, due to a vulnerability, be effectively attacked – and the importance of managing such vulnerabilities and misconfigurations with the necessary security controls.
Inception: IMDSv1
For the first 10 years, 2009-2019, since the inception of the EC2 service, the IMDS API had one, straightforward version: IMDSv1. As per AWS documentation, to extract credentials from IMDSv1, all a service running within the EC2 has to do is make a simple HTTP GET request, with no headers, to the following endpoint:
http://169.254.169.254/latest/meta-data/iam/security-credentials/<ROLE_NAME><ROLE_NAME> is the name of the IAM role that the EC2 uses which can also be retrieved from the IMDS via another HTTP GET request to the following URL:
http://169.254.169.254/latest/meta-data/iam/security-credentials/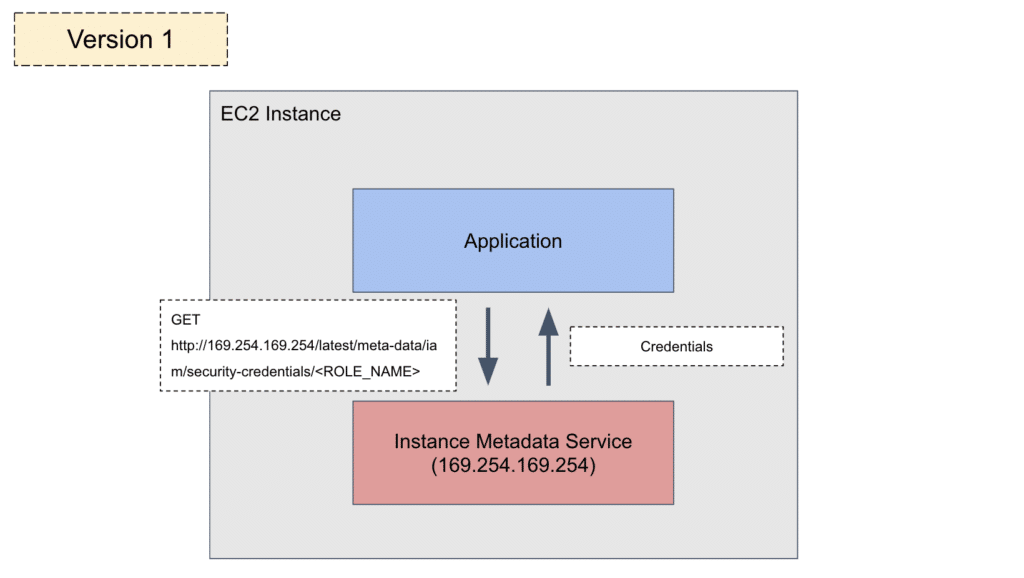
Figure 1: Illustration of an IMDSv1 credentials query
As mentioned, when an EC2 is exposed to misconfiguration or has vulnerable software running on it, this mechanism can be leveraged by an attacker to extract the EC2’s credentials.
There are two main scenarios for this to play out:
Server-side request forgery (SSRF) exposure
When software deployed on EC2 is vulnerable to SSRF, an attacker can leverage the vulnerability to manipulate the software to make requests on its behalf. A SSRF vulnerability can be exploited to extract credentials, if it “supports” a simple GET request (even without any custom headers or request methods).
Since this vulnerability exists in many web servers exposed to the internet, the combination of the vulnerability and IMDSv1 availability, along with network access to the instance, is usually all that’s needed for an attacker to successfully extract the credentials.
In a retrospective on public cloud breaches, Christophe Tafani-Dereeper, Rami McCarthy and Houston Hopkins describe the exploitation of an SSRF vulnerability to steal application cloud credentials as one of the four main causes of cloud security incidents in 2022.
Misconfiguration as a network device
When an EC2 is misconfigured as a network device with the purpose of routing traffic, the availability of IMDSv1 is also usually very easy to leverage as an attacker can take advantage of an EC2 with network access for routing traffic and IMDSv1 enabled.
A good example of this is a reverse proxy, which is designed to route traffic from other servers, as shown in the diagram below:

Figure 2: Reverse proxy illustration - Source: Cloudflare website
If the reverse proxy is an EC2 with IMDSv1 enabled, this interface will allow a request to be made to IMDS as if it were a web server (referred to in the diagram as an “origin server”) and get the response. With a GET request, an attacker can access the credentials. You may wish to read up on attack scenarios involving abuse of reverse proxies.
IMDSv2 to the rescue?
In 2019, AWS launched IMDS Version 2 of the API which, as mentioned before, adds significant layers of defense that deal with these exact scenarios.
Before we talk about its defense layers let’s understand how IMDSv2 works.
IMDSv2 introduces the use of tokens. Instead of making one HTTP GET request to get the credentials, the authentication works in two steps. First, you need to make a PUT request with the X-aws-ec2-metadata-token-ttl-secondsheader header, which returns a token that is valid for the number of seconds the header specifies.
This first step is illustrated in the diagram below:
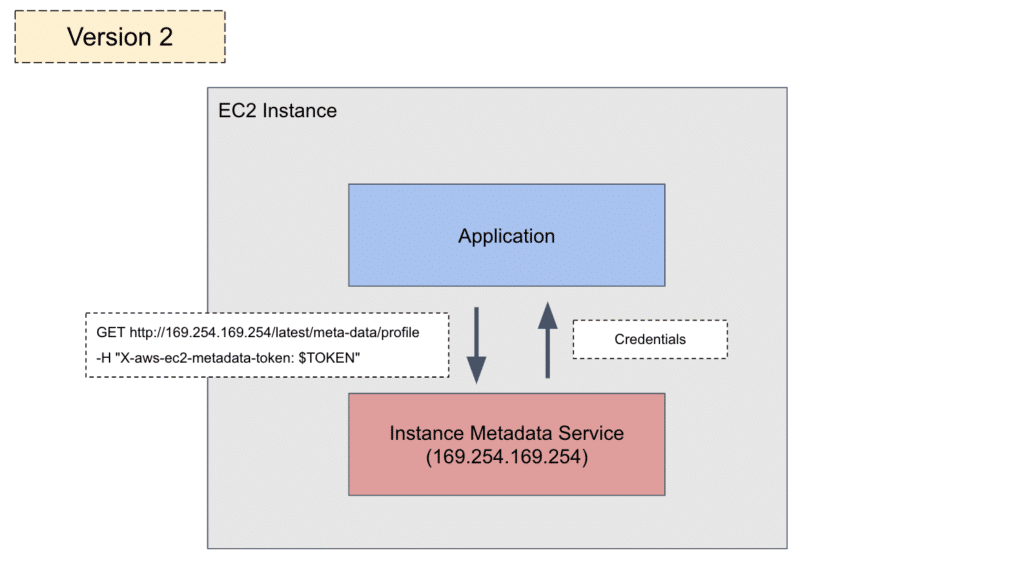
Figure 3: Acquiring a token using a PUT request with IMDSv2
As a second step, the token can be used by a follow-up HTTP GET request that includes the token in a header called X-aws-ec2-metadata-token, as shown in the following diagram:
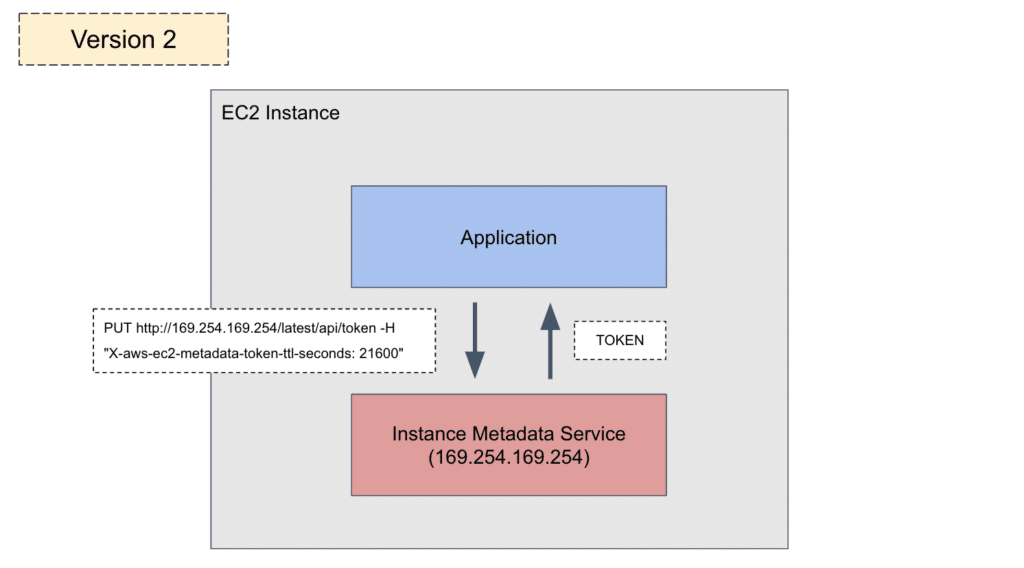
Figure 4: Getting credentials using a token with IMDSv2
The complete process for acquiring the credentials is illustrated in Figure 5:
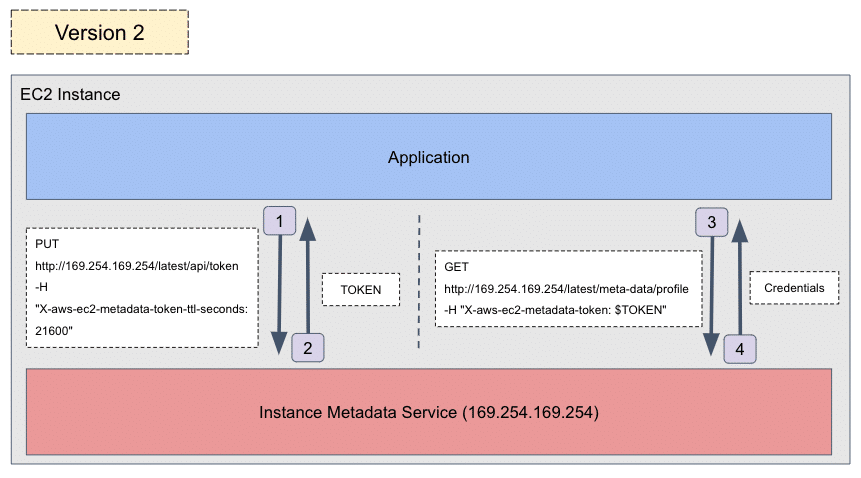
Figure 5: Full illustration of an application acquiring credentials with IMDSv2
On top of this major change to the process of acquiring credentials, two mechanisms provide additional security:
- As per an AWS blog post: “IMDSv2 will also not issue session tokens to any caller with an X-Forwarded-For header”
- The default TTL on the response of the PUT request for the token is 1
The improved credentials-acquiring process, along with the two mechanisms, makes both scenarios described above far more difficult for an attacker to leverage. Let’s see why.
In the scenario of leveraging an SSRF vulnerability on your EC2 instance: Rather than simply being able to make HTTP GET requests on behalf of the server, the attacker will need the SSRF vulnerability to be able to make PUT requests and send them with headers. As we will soon demonstrate (yes, a bit of a spoiler), getting to the credentials will not be impossible but requires the presence of a vulnerability, which is much scarcer.
In the scenario of an EC2 misconfigured as a network device and used for routing requests to other servers: If the TTL on the PUT requests is kept to a default of 1, the response to the PUT request for the token will not be routed outside the EC2. This is because the only hop it will be allowed to make is from IMDS to the application requesting it within the EC2.
Important Note: As per AWS documentation:
“In a container environment, if the hop limit is 1, the IMDSv2 response does not return because going to the container is considered an additional network hop. To avoid the process of falling back to IMDSv1 and the resultant delay, in a container environment we recommend that you set the hop limit to 2.”
Both these cases illustrate how IMDSv2 and the two mechanisms are a great safeguard.
In addition, as detailed in an AWS blog post, denial of requests for a token with the X-Forwarded-For header is yet another security layer against misconfigured EC2s, as open reverse proxies tend to include these headers. Also in the same blog, AWS describes the requirement for the PUT request to acquire the token as a protection mechanism from open WAFs, explaining that “analysis of third-party WAF products and open WAF misconfigurations found that the vast majority do not permit HTTP PUT requests.”
How popular is the use of IMDSv1 anyway?
You’d be surprised to know how many EC2 instances are launched with, despite there being no need for it, IMDSv1 enabled. This tendency may be because – unless the Amazon Machine Image (AMI) in use is configured with a different default – the default configuration upon launching a new EC2 instance is still to support both IMDSv1 and IMDSv2.
In preparing for this article, we randomly surveyed several dozen real-life AWS environments secured by the Ermetic (now Tenable Cloud Security) platform. The environments had different numbers of EC2 instances: from just over 60 to more than 6,000. We examined tens of thousands of instances overall and we found that over 93% (!) of the instances had IMDSv1 enabled. Upon examining the environments individually, we found that almost 74% of environments had IMDSv1 enabled on over 90% of a given environment’s EC2 instances.
Tenable Cloud Security also queries the CloudWatch MetadataNoToken metric, which allows you to check “the number of times the instance metadata service was successfully accessed using a method that does not use a token.” In short, the metric checks how many times, if any, IMDSv1 was actually used. Using Tenable results to the queried metric we were able to assess how many instances had not used IMDSv1 enabled access – meaning that IMDSv1 probably could have been disabled with no compromise to the business function of the instance. Interestingly, over 55% (!) of the instances with IMDSv1 enabled met this criteria. When we examined the instances individually, in a large portion of the instances we detected that IMDSv1 was enabled and wasn't recently used, which makes it probable that it could have been disabled safely.
As mentioned, these findings are based on actual customer data so they indicate real-life unnecessary exposure. Let’s look at how to mitigate this kind of risk by migrating instances from supporting IMDSv1 to enforcing IMDSv2, and how to limit new instances being launched from supporting IMDSv1.
Migration from IMDSv1 to IMDSv2
We hope by now you’re convinced: Enforcing availability of the IMDSv2 API is the superior security configuration over enabling IMDSv1. Absent a requirement to use Version 1, you should be enforcing Version 2.
You’ll want to ensure that no unnecessary availability of IMDSv1 exists in your environment.
The action for doing so – configuring instance metadata options – is rather simple on its own.
Below, we describe two important aspects of the process for performing the migration: detecting instances with IMDSv1 enabled and retiring this configuration responsibly.
Using AWS Config to detect instances with IMDSv1 enabled
A simple way to detect instances that support IMDSv1 is to use AWS Config (make sure you review AWS Config pricing before enabling it), which has a pre-built AWS managed rule called ec2-imdsv2-check that checks to ensure that Version 2 is in use (rather than Version 1).
AWS even has an AWS Systems Manager runbook called AWSConfigRemediation-EnforceEC2InstanceIMDSv2 that allows you to easily fix this finding.
You can also set up automatic remediation of IMDSv1 availability; however, for reasons explained in the next section, we do not recommend doing so.
Retire IMDSv1 availability responsibly
The most important thing to confirm when enforcing IMDSv2 in EC2 instances -- for new but especially existing instances -- is that IMDSv1 is not actually needed. The last thing you want to do is disable needed and used access to such an API; doing so might break services you rely on. We therefore do not recommend automatically remediating an IMDSv1 configuration; rather, you should do so only after careful examination that the IMDSv1 usage is no longer needed.
If you find an EC2 with IMDSv1 enabled, you have to make sure IMDSv1 is not in current use before disabling it.
To do so more easily you can, as mentioned before, query the CloudWatch metric MetadataNoToken.
The process for doing so is simple; under CloudWatch, open All metrics:

Figure 6: CloudWatch dashboard
Then choose EC2:

Figure 7: Choosing metrics for the EC2 service
Then choose “Per-Instance Metrics”:

Figure 8: Choosing “Per-Instance Metrics”
You can then simply add a filter for “MetadataNoToken”:

Figure 9: Filtering for the MetadataNoToken metric
The graph displayed will show you if IMDSv1 is in use. If you find it is, you should find out why and, if appropriate, replace usage of it with calls to IMDSv2.
The results of this check will make the job of looking for existing use of IMDSv1 much easier and, as we will see next, this is a crucial part of the due diligence required before enforcing IMDSv2.
In addition to this CloudWatch metric, you can find helpful information in the CloudTrail events of calls made using credentials stored in the IMDS. These CloudTrail events include, in the “sessionContext” object, a field called “ec2RoleDelivery,” which indicates with which IMDS API version the credentials were retrieved.

Figure 10: CloudTrail event for a call made with IMDS-stored credentials indicates with which API version the credentials were retrieved
Below, we have listed the recommended steps to take in the process of enforcing IMDSv2 for each instance:
Step 1 – Replace proprietary calls to IMDSv1
Your organization may also have proprietary/3rd party software making calls to IMDSv1. If so, do a thorough check looking for such occurrences and, where possible, replace such calls with calls to IMDSv2.
Step 2 – Upgrade the AWS SDK
The usual “culprit” for using IMDSv1 is the AWS SDK used on the machine. So the next thing you’ll want to do is check that IMDSv1 is not actually required in case the current used SDK is not of the minimum required version for using IMDSv2 or higher. If it’s not, upgrade the SDK, while, of course, making sure your usage of the EC2 still works as expected! See next step.
Step 3 - Verify the EC2 functions as expected
After making these changes, make sure your EC2 instances perform properly without any calls made to IMDSv1 (perhaps checking again for the MetadataNoToken metric). Only after you’ve verified that disabling IMDSv1 will not compromise operation of the EC2 instances, enforce IMDSv2.
Note: This process is of course to be done first in a lower environment such as Testing, rather than straight on Production. Also, it goes without saying that proper testing is required when making such a change even for instances where recent IMDSv1 calls weren’t detected.
How to enforce IMDSv2 across your AWS accounts
Other than migrating existing EC2 instances to have IMDSv2 enforced, you should aspire to prevent the launch of new EC2 instances not configured with IMDSv2 -- or at least keep a close watch when such instances get launched.
You can do so by setting an AWS Organizations service control policy (SCP) that limits two actions for AWS IAM identities on the target AWS account:
- Launching of instances without the IMDSv2 configuration
- Modifying the metadata options of existing EC2 instances
The following SCP accomplishes both aims. It also sets an exception for <ADMIN_ROLE> to enable performing these operations by an admin for certain EC2 instances in edge cases.
{
   "Version": "2012-10-17",
   "Statement": [
       {
           "Action": [
               "ec2:RunInstances"
           ],
           "Resource": [
               "arn:aws:ec2:*:*:instance/*"
           ],
           "Effect": "Deny",
           "Condition": {
               "StringNotEquals": {
                   "ec2:MetadataHttpTokens": "required"
               }
           }
       },
       {
           "Action": "ec2:ModifyInstanceMetadataOptions",
           "Resource": "*",
           "Effect": "Deny",
           "Condition": {
               "StringNotEquals": {
                   "aws:PrincipalArn": "<ADMIN_ROLE>"
               }
           }
       }
   ]
}
IMDSv2 is not a silver bullet
Unfortunately, even with IMDSv2 enforced, your environment may contain vulnerable software and/or misconfigurations that expose IMDS to being effectively harvested for credentials. According to the shared responsibility model, managing and mitigating such exposure is your responsibility.
This is a great reason why you’d want to employ guardrail mechanisms, such as the configuration of data perimeters to enforce access to resources from trusted networks only. Such guardrails can greatly minimize the impact of the exfiltration of credentials.
We provide here a “recipe” and real-life example of a scenario in which an IMDSv2 enforced EC2 instance remains exploitable due to vulnerable software.
The recipe is as follows:
Ingredient #1: Default credentials to SSRF on the admin panel
From our previous research on web applications in the cloud, we know this vulnerability chain to be a pretty common scenario. Web applications for management uses usually have an authenticated admin panel with extended functionality. Quite like internal assets, developers may neglect the functionalities in terms of security due to the highly privileged authentication needed to access and use them. As a result, these functionalities are often prone to being vulnerable.
Ingredient #2: Juicy SSRF functionality
This ingredient is not commonly achieved but is still seen in the wild. One example of the extended functionalities is a webhook. As defined by Redhat, “A webhook is an HTTP-based callback function that allows lightweight, event-driven communication between two application programming interfaces (APIs).”
Webhooks are frequently used by applications to integrate with other applications. Most applications have the user input a URL for the webhook, and even HTTP custom headers and parameters, to test the webhook functionality.
SSRF on IMDSv2, anyone?
Putting it together
Here’s an example to help you understand and be able to remediate an attack: a vulnerable version of a Jira server hosted on AWS EC2 that can be leveraged by an unauthorized user or third party even when IMDSv2 is enforced.
Jira is a project- and issue-tracking software product that helps teams plan, track and discuss work. Originally designed for software development teams, today Jira is a powerful tool for helping teams stay organized and on track, and is especially useful for managing complex projects with multiple stakeholders and dependencies. Many organizations across industries use it to manage projects of all kinds.
One of Jira’s unique features is its ability to customize workflows and create custom fields to fit the specific needs of a team or organization. This makes it a highly flexible tool that can be tailored to a variety of use cases.
Let’s say that Organization A has decided they want to use Jira. They install a Jira instance on one of the organization’s EC2s and open its security groups to any IPv4 address for convenient access.
“Luckily,” they enforce IMDSv2 on the EC2:

Figure 11: CLI request to edit the metadata options of an EC2 to enforce IMDSv2
Let’s imagine we are attackers. After we scan the external network of Organization A, we notice the Jira instance listening on port 8080.

Figure 12: JIRA console
Jira’s default credentials are admin:admin. We randomly use these credentials to try logging in and, surprisingly, they work!
Because it is so popular, Jira has a lot of CVEs. To figure out which are available to us as attackers, we look at the version of the Jira instance we’re using:
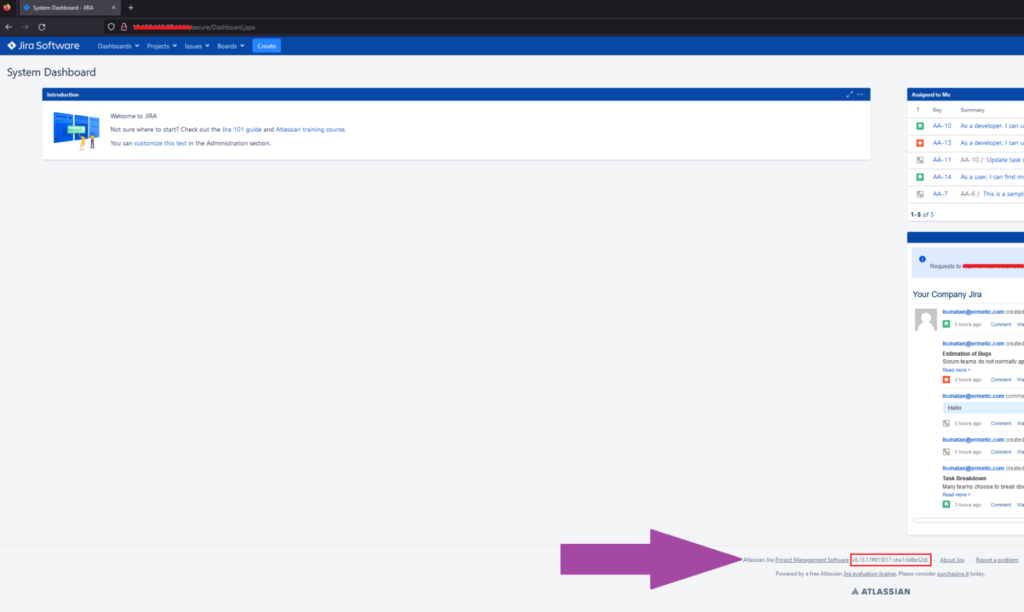
Figure 13: Locating the JIRA version
The Jira version is 8.13.17, which is vulnerable to CVE-2022-26135 - Full authenticated SSRF in the Mobile Plugin for Jira Data Center and Server. It is worth mentioning that this version is also vulnerable to authentication bypass; for this real-world scenario, we could have used authentication bypass rather than default credentials.
In the Jira mobile plugin, the batch feature allows the performing of actions on multiple issues at the same time. This feature is useful for making the same change to multiple issues or quickly updating the status of a group of issues. One batch feature is to allow the requesting of resources from locations under the Jira host.
The vulnerability exploits a concatenated user input through the “location” parameter that can be used to perform SSRF on the Jira server.
The following code uses the batch request and takes the location, method, headers and body from the user:
private Optional<BatchResponseBean> execute(BatchRequestBean requestBean, Map<String, String> headers) {
String relativeLocation = requestBean.getLocation();
URL jiraLocation = toJiraLocation(relativeLocation);
if (jiraLocation == null) {
    return Optional.of(buildResponse(relativeLocation, 400));
 }
Request request = (new Request.Builder()).url(jiraLocation).headers(Headers.of(headers)).method(requestBean.getMethod().name(), (requestBean.getBody() == null) ? null : RequestBody.create(JSON, requestBean.getBody().toString())).build();
try {
    Response response = this.httpClientProvider.sendRequest(request);
    BatchResponseBean responseBean = toResponseBean(relativeLocation, response);
    return Optional.of(responseBean);
}
catch (Exception e) {
    log.error("Error when calling url: [" + relativeLocation + "]", e);
    return Optional.empty();
}
}
Let's dive into the toJiraLocation function:
private URL toJiraLocation(String relativeLocation) {
try {
    return this.linkBuilder.forRelativePath(relativeLocation).toURL();
}
catch (Exception e) {
    log.warn("Cannot parse relative location: [" + relativeLocation + "]");
    return null;
}
 }
linkBuilder.forRelativePath:
public URI forRelativePath(String path) {
    return URI.create(this.jiraBaseUrls.baseUrl() + path);
 }
As you can infer from the code above, the plugin was supposed to take the path location from the user. The main issue with this code is that it is missing input validation. Specifically, adding a slash “/” after the baseUrl (this.jiraBaseUrls.baseUrl()) would be sufficient to prevent the attack. The slash “/” would make any user input interpreted as the path of the base URL (Jira host).
As sophisticated attackers, we can disrupt this behavior by inputting @ and then the desired URL input into the location parameter. The “@” forces the client to treat the Jira baseUrl as HTTP credentials for the attacker’s domain, leading to a request to the attacker’s domain.
So, our input could look like this:
http://jirahost + @ssrf_target_url.com - http://jirahost@ssrf_target_url.com → http://ssrf_target_url.com
Another method for exploiting this behavior is to input a domain we control starting with a dot “.”, making the hard-coded Jira host before a subdomain of its input/domain.
http://jirahost + .myevildomain.com - http://jirahost.myevildomain.com
By controlling “myevildomain.com” we can use a DNS record to refer the victim to 169.254.169.254, exploiting SSRF.
By exploiting this vulnerability, we can try to access the IMDS credentials of the EC2 that is hosting the Jira server:

Figure 14: An attacker trying a GET request without headers, gets unauthorized access
Darn! The EC2 was modified to use only IMDSv2 – we got unauthorized access.
Is it a dead end?
Since we have full SSRF functionality allowing us to add headers that will be proxied with the request, and can specify the request method and the body of the request – we can actually query IMDS despite its using IMDSv2.
We need to first craft a request to query
X-aws-ec2-metadata-token by changing the request method to “PUT” and adding the header
X-aws-ec2-metadata-token-ttl-seconds to the request headers that will be proxied to the SSRF target (IMDS).
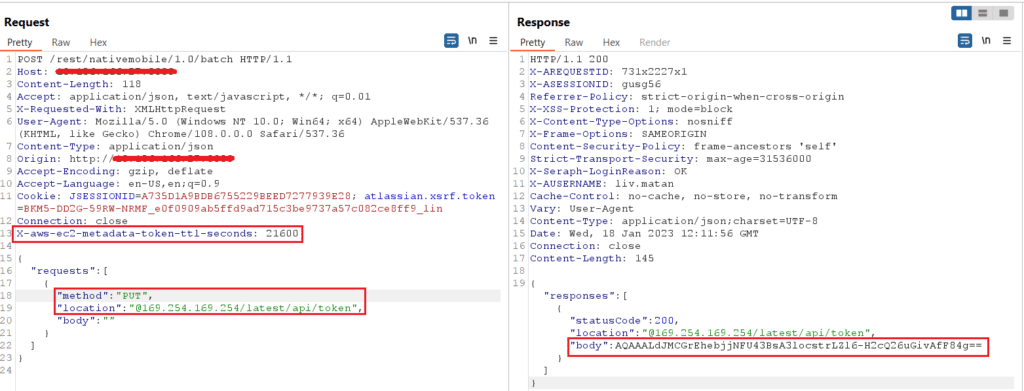
Figure 15: Successful PUT request with headers by the attacker to retrieve the token
We, as attackers, can then use the metadata token we took to request any metadata we want from IMDS. Our first target will be the security credentials of the victim’s EC2, which we successfully query by supplying the metadata token:

Figure 16: Getting the credentials using the acquired token
Bingo! We will have access to EC2 instance profile credentials!
Takeaways
In this post we’ve reviewed the importance of enforcing IMDSv2 and provided some practical tips on how to do so.
Yet, as we’ve shown, even having IMDSv2 enforced does not make your environment immune to the fallout of deploying vulnerable software and/or having a misconfigured environment.
For this reason, it’s significant to make sure you use updated software and pay close attention to configurations that may impact your security posture.
Some examples of such configurations that could be relevant in the case we have demonstrated:
- EC2 security groups - Virtual firewalls that control inbound and outbound traffic to and from your EC2 instances. These firewalls allow you to specify which traffic is allowed to reach your instances. If not configured correctly, a security group can pose a security risk to your instances and the resources in your VPC. It is important to carefully review and configure your security groups to ensure they are secure.
Default credentials - Pre-configured username and password combinations for a system or application. Using default credentials poses a security risk because they are well-known and can easily be discovered by attackers. To mitigate this risk, change default credentials as soon as possible after setting up a new system or application, and use strong, unique passwords for all systems and applications.
- Information disclosure - Making information publicly available, either intentionally or unintentionally. Disclosing information about a server can pose a security risk because it can provide attackers with valuable information they can use to target the server. For example, a Jira server's version number is publicly available by default, so an attacker may be able to find and exploit vulnerabilities specific to the software’s version. To protect against this risk, it is important to hide version numbers and take other steps to protect sensitive information, such as restricting access to sensitive directories and using secure protocols to transmit information. However, hiding information is just a guardrail. Keeping all software and systems up to date to ensure that any known vulnerabilities are patched in a timely manner is the first step to a more secure environment.
Related Articles
- Cloud


